n set_parms 사용
set_parms 는 시스템의 N/W과 관련된 사항을 구성할 때 사용하는 프로그램으로
다음과 같은 arguments를 사용한다.
set_parms argument | Comments |
Hostname | Hostname 을 설정 |
Timezone | Time zone 을 설정 |
date_time | Date and time 을 설정 |
root_passwd | Root passwd 을 설정 |
Ip_address | Internet protocol address 를 설정 |
addl_network | Subnet mask, DNS, NIS 등 설정 |
Initial | 위의 모든 사항을 설정 |
None | Set_parms 의 사용법 설명 |
[예제] # set_parms initial
n 수동 구성
① configuration file 에 구성하기
# vi /etc/rc.config.d/netconf
② network enable 시키기
# /sbin/init.d/net start
③ networking 확인
# netstat ?in
# ifconfig lan0
# ping 192.1.1.1
n SAM 이용
# sam a Networking and Communications 선택
- lanadmin(landiag) 네트웍H/W 의 이상을 진단하는 명령
- ifconfig 네트웍 구성 및 확인을 위해 사용하는 명령
[예제1] # ifconfig lan0 a 상태 확인할 때
[예제2] # ifconfig lan0 192.1.1.1 netmask 255.255.255.0 up
a 네트웍 구성할 때 (임시로 할당)
- netstat -r 네트웍의 routing 상태를 확인함
- lanscan 설치되어 있는 NIC(Network Interface Card)의 address
(예: 0x0060b018cd17) 및 상태를 확인할 수 있음
- hostname 시스템 이름을 알고 싶을 때 사용
- ping 네트웍 작동을 테스트할 때 사용
① 하드웨어 문제인가 확인한다. 또한LAN 케이블이 HUB와 정상적으로 연결
되 있는지를 확인한다. 이 때 사용할 수 있는 명령으로는 “lanadmin”(또는
[예제] # lanadmin ð lan 또는 l 이라고 입력함 ð display 또는 d 라고 입력함 (이 때 LAN하드웨어 상태를 볼 수 있음) ð reset ( H/W적인 문제가 있다면 reset시간이 오래 걸림) |
landiag)이 있다.
② 하드웨어에 이상이 없다면 IP Address가 정상적으로 부여되었나 확인한다.
[예제] # ifconfig lan0 lan0: flags=863<UP,BROADCAST,NOTRAILERS,RUNNING,MULTICAST> inet 15.32.13.19 netmask fffff800 broadcast 15.32.15.255 ð 여기서 “UP” 되었나 확인하고, IP Address와 netmask가 정상적인지 확인한다. ð /etc/rc.config.d/netconf 에 제대로 설정되었는지 확인한다. |
③ “ping” 명령으로 상대편과의 통신을 테스트 한다.
[예제] # ping 15.32.13.18
④ Name resolution이 제대로 되는지 확인한다.
[예제] # nslookup 15.32.13.18 ð hostname 과 IP address를 확인 ð # vi /etc/hosts 의 내용 확인 ð # ll /etc/resolv.conf : 이 파일이 존재하면 DNS Server에 시스템이 등록되어 있는지 확인해야 함 |
n 개요
nsswitch.conf 파일은 네트워크 데이터베이스로부터 정보를 얻기 위해 library routine이 사용되는 조회 정책을 명시하는 파일이다. 데이터베이스의 예로는 DNS, NIS 또는 /etc/hosts파일(local file) 등이 있다.
n 사용법
- /etc/nsswitch.conf 에 조회 순서를 명시하여 구성한다. (SAM으로도 가능)
- 예제 파일 : /etc/nsswitch.* 로 예제 파일 존재
- 호스트이름 조회가 정상적으로 이루어지는 지를 알기 위해선 다음 명령을 이용
한다.
# nslookup 또는 # nslookup hostname
ð 조회하고자 하는 호스트이름을 덧붙이면 DNS 나 /etc/hosts에서 발견된원래의 호스트이름과 IP Address가 출력된다.
부록 1. HP-UX 명령어
n User-level commands
bdf 파일 시스템의 통계, 용량 및 빈 공간을 나타낸다.
chmod 파일이나 디렉토리의 permission을 바꾼다.
[예제] $ chmod 600 private
chown 파일이나 디렉토리의 ownership을 바꾼다.
[예제] /dev/lp의 ownership을 lp로 변경
$ chown lp /dev/lp
cp 파일 및 디렉토리를 복사한다.
[예제] /etc/passwd를 /etc/passwd.old로 복사
$ cp /etc/passwd /etc/passwd.old
[예제] /etc 디렉토리 및 하부의 파일들을 /tmp/etc로 복사
$ cp ?r /etc /tmp
diskinfo 시스템에 설치되어 있는 디스크의 정보를 보여줌.
[예제] $ diskinfo /dev/rdsk/c0t6d0
du 디스크 사용에 관한 정보를 보여줌.
[예제] /tmp 디렉토리에 있는 파일들의 크기를 KB단위로 보여줌
$ du ?s ?k /tmp
exit 로그아웃하고 쉘 및 쉘 프로그램을 종료.
file 파일 내용의 성격을 보여줌.
[예제] /stand 디렉토리 아래에 있는 파일들의 성격을 보여줌
$ file /stand/*
find 파일 시스템에서 파일의 위치를 찾는다.
[예제] root 밑에 있는 모든 “core” 파일을 찾는 법
$ find / -name core -print
grep 파일 내에서 특정 패턴을 찾는다.
[예제] $ grep -l ifconfig /sbin/init.d/*
kill 프로세스를 죽일 때 사용함.
[예제] $ kill -9 924
lp 시스템의 기본 프린터에 파일을 프린트.
[예제] $ lp myfile
lpstat ?t 모든 프린터 스풀러에 관련된 정보를 보여줌.
ls 파일이나 디렉토리의 이름을 보여줌.
[예제] /stand 디렉토리에 있는 모든 파일 명을 보기
$ ls /stand
ll ll은 “ls ?l”과 같다. 파일들의 이름 및 정보를 보여줌.
man 명령 및 시스템 파일에 대한 사용법을 보여줌.
[예제] $ man ls
[참고] man page 참조 시 편리한 방법
$ man command | col ?b > /tmp/command
$ vi /tmp/command
more 텍스트 파일 내용을 페이지 단위로 봄.
[예제] $more /.profile
more가 수행되는 동안 한 페이지의 텍스트를 더 보려면 SPACEBAR 를 누른다. 한 줄을 더 보기 위해서는 ENTER 를 누른다.
mv 파일이나 디렉토리의 이름을 바꾼다.
[예제] oldfile을 newfile로 바꾸기 변경
$ mv oldfile newfile
ps ?ef 시스템에서 수행되고 있는 모든 프로세스를 보여 준다:
[예제] $ ps -ef
UID PID PPID C STIME TTY TIME COMMAND
root 0 0 0 Sep 6 ? 0:02 swapper
root 1 0 0 Sep 6 ? 0:00 init
root 2 0 0 Sep 6 ? 0:00 vhand
root 3 0 0 Sep 6 ? 2:14 statdaemon
root 4 0 0 Sep 6 ? 0:11 unhashdaemon
root 7 0 0 Sep 6 ? 0:00 ttisr
root 12 0 0 Sep 6 ? 0:00 lvmkd
UID The user who is the process owner.
PID The process ID number of the process.
PPID The process ID number of the parent process.
C Processor utilization for scheduling.
STIME Starting time of the process. If the elapsed time is greater than 24 hours, the starting date is displayed instead.
TTY The controlling terminal for the process, if any.
NOTE: A question mark (?) in this field indicates that the process is not associated with any tty.
TIME The cumulative execution time for the process (reported in the form "minutes:seconds").
COMMAND The command name.
rm 파일이나 디렉토리를 지운다.
[예제] /var/tmp/swagent.log를 삭제
$ rm /var/tmp/swagent.log
[예제] /var 디렉토리 및 그 디렉토리의 내용을 삭제
$ rm ?r /var
경고: 한번 파일이나 디렉토리가 지워지면 복구할 수 있는 유일한 방법은 백업으로부터 복구하는 것이다. 또한 위와 같이 디렉토리 및 디렉토리의 내용을 지우는 것을 “/”와 같은 시스템 디렉토리에 수행하는 것은 절대로 금한다.
rmdir 빈 디렉토리를 없앤다.
[예제] 빈 디렉토리 /tmp/hp를 삭제
$ rmdir /tmp/hp
top 주기적으로 변하는 프로세스의 정보를 보여줌.
uname 현재 로그인 되어 있는 컴퓨터의 정보를 보여준다.
[예제] 시스템의 모델, OS 버전, User License수 등을 보여줌
$ uname -a
vi 텍스트 파일을 편집한다.
[예제] /.profile을 편집
$ vi /.profile
what 파일의 버전 정보를 보여줌
[예제] $ what /usr/bin/cc
who 현재 누가 로그인 되어있는 지를 보여줌.
who am i 현 사용자의 로그인 명, tty 및 로그인한 날짜/시간을 보여줌.
who ?r 현재의 run state를 보여줌.
n Administrative commands
dmesg 시스템의 diagnostic 메시지를 화면으로 출력한다.
dmesg의 출력으로부터 현 시스템에 장착되어 있는 총 메모리 용량, 가
용 메모리 용량, 커널 수준의 에러 및 시스템에서 사용 가능한 하드웨어
의 디바이스의 하드웨어 경로를 아래의 예에서 볼 수 있다.
[예제] # dmesg
May 25 09:49
vuseg=c18000
inet_clts:ok inet_cots:ok 1 graph3
2 bus_adapter
2/0/1 c720
2/0/1.2 tgt
2/0/1.2.0 sdisk
2/0/2 lan2
2/0/4 asio0
2/0/6 CentIf
2/0/8 audio
2/0/10 fdc
ps2_readbyte_timeout: no byte after 500 uSec
2/0/11 ps2
5 bus_adapter
5/0/1 hil
5/0/2 asio0
4 eisa
8 processor
9 memory
System Console is on the ITE
Networking memory for fragment reassembly is restricted to 5423104 bytes
Swap device table: (start & size given in 512-byte blocks)
entry 0 - auto-configured on root device; start = 3891200, size = 302102
Defaulting dump to primary swap
Dump device table: (start & size given in 1-Kbyte blocks)
entry 0 - major is 31, minor is 0x5000; start = 2029565, size = 65537
Starting the STREAMS daemons.
B2352B HP-UX (B.10.20) #1: Sun Jun 9 08:03:38 PDT 1996
Memory Information: physical page size = 4096 bytes, logical page size = 4096 bytes
Physical: 65536 Kbytes, lockable: 39448 Kbytes, available: 48288 Kbytes
fsck file system check
파일 시스템이 어떤 이유(정전 등)에 의해 불안정할 때 check 및 복구하
는 명령.
init s 시스템을 single user mode로 바꿈.
init 4 시스템을 run level 4로 되돌림.
insf Special 파일의 설치.
[예제] 아직 special file이 설치되지 않은 모든 새로운 하드웨어의
special file을 설치
# insf
[예제] 시스템에 있는 모든 special file을 재생성하는 예:
# insf -e
특정 하드웨어 경로의 special 파일만 설치
[예제] 하드웨어 어드레스 2/52.0.0을 이용하는데 쓰이는 모든 장치 파
일을 설치
# insf -H 2/52.0.0
lssf 디바이스 파일의 속성을 나타낸다.
[예제] # lssf /dev/lp /dev/dsk/c0t6d0
rmsf 특정 하드웨어 경로의 디바이스 파일 삭제.
[예제] 하드웨어 경로 2/52.0.0에 연결되어 있는 디바이스 파일을 삭제
# rmsf -H 2/52.0.0
ioscan ?fn 시스템에 연결되어 있는 모든 디바이스의 정보 및 그에 관련된 디바이스
파일을 찾아서 보여줌.
mount 마운트 된 모든 파일 시스템을 보여줌. 또한 다음과 같이 파일 시스템을
마운트할 때 사용함.
[예제] # mount /dev/dsk/c1t4d0 /cdrom
mount ?a 현재 마운트 되어 있지 않은 /etc/fstab내에 있는 모든 파일 시스템의
마운트.
mount ?p 마운트 된 파일 시스템의 옵션을 보여줌.
swapinfo -t 디바이스 및 파일 시스템의 스왑에 관한 정보를 보여준다.
umount 파일 시스템을 unmount한다.
/cdrom 파일 시스템을 unmount하기 위한 예:
[예제] # umount /cdrom
또는
# umount /dev/vg00/lvol5
부록 2. STDIN, STDOUT, STDERR 파일
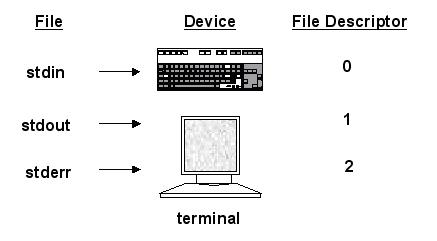
n 출력 파일 생성 방법 : Redirecting standard output (stdout):
- Use > or 1> to create or over write the output file.
[예제] $ cat /etc/inittab > /tmp/config.info
- Use >> or 1>> to append to the end of an existing file.
[예제] $ cat /etc/gettydefs >>/tmp/config.info
n 입력 파일 사용 방법 : Redirecting standard input (stdin):
- Use < to take a command’s input from a file.
[예제] $ mail wkc@abc.com < letter
n 에러 파일 생성 방법 : Redirecting standard error (stderr):
- Use 2> to create or overwrite the output file.
[예제] # fbackup -0i /usr -e /usr/lib -f /dev/rmt/0m 2> /tmp/backup.err.log
- Use 2>> to append to the end of an existing file.
[예제] $ tar cvf /dev/rmt/0m /home 2>> /tmp/tar.error.log
- Use 2>&1 to redirect error messages to the same file as the standard output.
[예제] $ find /etc/ -name rc.config.d > /tmp/find.out 2>&1

![[차례]](http://www.netso.co.kr/Unixhelp/Pages/Images/weetop.gif)
![[찾기]](http://www.netso.co.kr/Unixhelp/Pages/Images/weesearch.gif)
![[색인]](http://www.netso.co.kr/Unixhelp/Pages/Images/weeindex.gif)